How to Build Drawers for Cabinets
Building drawers for cabinets is a rewarding woodworking project that enhances functionality and aesthetics in any space. From kitchen cabinets to bathroom vanities, custom-built drawers offer tailored storage solutions and a personalized touch. This article will guide you through the process of constructing durable and attractive drawers, providing clear instructions and helpful tips for success.
1. Planning and Design
Before diving into construction, careful planning and design are crucial for creating drawers that fit perfectly and meet your specific needs. This involves determining the dimensions, style, and materials for your drawers. Consider factors like:
- Cabinet Dimensions: Measure the interior dimensions of your cabinet to ensure the drawers fit snugly. Allow for a small gap for smooth operation.
- Drawer Depth and Width: Decide on the desired depth and width of the drawers, taking into account the intended use and the available space within the cabinet.
- Drawer Front Style: Choose a drawer front style that complements the overall aesthetic of your cabinets, ranging from simple flush fronts to more ornate designs.
- Materials: Select quality materials that are durable and resistant to wear and tear, such as plywood, solid wood, or even melamine boards.
Once you have a clear vision for your drawers, create a detailed plan with precise measurements and sketches. This will serve as a guide throughout the construction process.
2. Cutting and Assembly
With your design in place, the next step is to cut the materials and assemble the drawer boxes. This process involves:
- Cutting the Drawer Sides and Back: Use a saw, such as a circular saw or table saw, to cut the drawer sides and back to the specified dimensions. Ensure precise cuts for a snug fit.
- Cutting the Drawer Bottom: The drawer bottom should be slightly smaller than the inside dimensions of the sides and back to allow for easy sliding. Optionally, rout a dado into the sides and back to create a groove for the bottom.
- Assembling the Drawer Box: Use wood glue and screws to secure the sides, back, and bottom together. Apply glue to the mating surfaces and clamp the box tightly until the glue dries.
Remember to use a level and square to ensure the drawer box is assembled accurately and without any distortions.
3. Drawer Front and Hardware
Once the drawer box is complete, the next steps focus on attaching the drawer front and installing the hardware:
- Cutting and Attaching the Drawer Front: If you are using a separate drawer front, cut it to size and attach it to the drawer box using glue and screws. Ensure that the front lines up flush with the sides and back. Consider adding decorative moldings or trim to enhance the appearance.
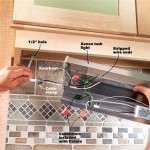
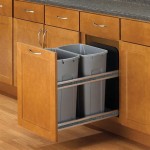
- Installing Drawer Slides: Choose appropriate drawer slides based on the weight of the drawers and the desired extension. Installing drawer slides involves pre-drilling holes and securing them to the sides of the drawer box and the cabinet frame. Accurate installation is critical for smooth operation.
- Installing Drawer Pulls or Knobs: Install drawer pulls or knobs based on your design preferences. Choose hardware that complements the style of your cabinets and enhances the functionality of the drawers.
When selecting hardware, consider factors like ease of use, durability, and aesthetics.
4. Finishing Touches
After assembling and installing the drawers, it's time to add the finishing touches to enhance their appearance and durability. This may involve:
- Sanding and Filling: Sand the entire drawer surface to create a smooth finish. Fill any gaps or imperfections with wood filler.
- Painting or Staining: Apply paint or stain to match the existing cabinets or create a desired look. Multiple coats are recommended for a durable and even finish.
- Adding Decorative Details: Consider adding embellishments like decorative hinges, corner brackets, or custom-made accents to add a touch of elegance and personalization to your drawers.
Take your time with the finishing processes to achieve a professional-looking and long-lasting result.
Tips for Success
To ensure successful drawer construction, consider these additional tips:
- Use quality materials: Invest in plywood or solid wood for durability and longevity. Choose materials that are well-suited to the intended use of the drawers.
- Plan for assembly: Before cutting, carefully consider the assembly process and the necessary components. This will minimize errors and streamline construction.
- Measure twice, cut once: Accuracy is crucial in woodworking. Measure carefully and double-check before making any cuts to ensure a precise fit.
- Test the drawers before installation: Before permanently installing the drawers, test their sliding operation to ensure smooth movement and even spacing.
- Consider using a jig or template: Using a jig or template can help create consistent and accurate cuts for multiple drawers.

How To Build Kitchen Cabinets Install Drawer Slides

How To Make Drawers In 6 Easy Steps Fixthisbuildthat

Making Drawers For Cabinets Ibuildit Ca

How To Build Drawers A Complete Guide Drawer Making

15in 4 Drawer Base Cabinet Carcass Frameless Rogue Engineer

How To Build Drawer Base Cabinets Houseful Of Handmade

How To Build A Cabinet Drawer The Easiest Way Possible Sawdust Girl

How To Build Drawers A Complete Guide Drawer Making

How To Build A Drawer Gray House Studio

Demystifying Drawer Sizing Kreg Tool
See Also