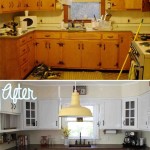
How To Chalk Paint Cabinets
Chalk paint offers a versatile and accessible method for revitalizing kitchen or bathroom cabinetry. This guide provides a comprehensive overview of the process, from preparation to finishing, enabling a smooth and successful painting experience.
Preparation is Key: The first step involves thorough preparation of the cabinet surfaces. This ensures optimal paint adhesion and a professional-looking finish. Begin by removing hardware such as knobs, pulls, and hinges. This allows for unhindered access to all paintable areas and prevents accidental paint coverage on the hardware.
Cleaning for Adhesion: Grease, grime, and cooking residue can compromise paint adhesion. Thoroughly clean all cabinet surfaces with a degreasing cleaner. A mixture of warm water and a mild dish soap is often sufficient. For stubborn grease, a dedicated degreaser may be required. After cleaning, rinse the cabinets with clean water and allow them to dry completely.
Repairing Imperfections: Inspect the cabinets for any imperfections such as dents, scratches, or holes. Fill these imperfections with wood filler, following the manufacturer's instructions. Once the filler has dried, sand the repaired areas smooth with fine-grit sandpaper. This creates a uniform surface for paint application.
Sanding for Smoothness (Optional): While not always necessary, lightly sanding the cabinet surfaces with fine-grit sandpaper can improve paint adhesion, particularly on cabinets with a glossy finish. This light sanding creates a slightly roughened surface that provides a better grip for the paint. After sanding, wipe down the cabinets with a tack cloth to remove any dust.
Protecting Surfaces: Before painting, protect adjacent surfaces such as countertops, walls, and floors with painter's tape and drop cloths. This prevents accidental paint spills and splatters from marring these surfaces.
Priming (Sometimes Necessary): Primer isn't always required with chalk paint, but it can be beneficial in certain situations. If the cabinets are made of a wood species known for bleeding tannins (like redwood or knotty pine), a primer will help prevent these tannins from discoloring the paint. Primer is also recommended for cabinets previously painted in a dark color, especially when painting with a lighter chalk paint color.
Applying the Chalk Paint: Chalk paint can be applied with a brush or a roller. A high-quality brush designed for chalk paint is recommended for optimal results. Apply the paint in thin, even coats, working in the direction of the wood grain. Avoid over-brushing, which can create streaks and an uneven finish. Allow each coat to dry completely before applying the next.
Multiple Coats for Coverage: The number of coats required will depend on the desired opacity and the color of the chalk paint. Lighter colors may require more coats than darker colors. Typically, two to three coats are sufficient for full coverage.
Distressing (Optional): Distressing is a popular technique used with chalk paint to create a vintage or antique look. Once the paint has dried, lightly sand the edges, corners, and other areas where natural wear and tear would occur. This reveals the underlying wood or previous paint color, adding character and dimension to the piece.
Sealing for Protection: Sealing the chalk paint is crucial for protecting the finish and ensuring its longevity. Chalk paint is porous and easily susceptible to stains and water damage without a sealant. Wax or a clear sealant can be used to protect the painted surface.
Applying Wax: Wax provides a durable and water-resistant finish while enhancing the depth and richness of the chalk paint color. Apply the wax with a soft cloth or brush, working in small sections. Allow the wax to dry according to the manufacturer's instructions, then buff it to a soft sheen with a clean cloth.
Using a Clear Sealant: A clear sealant provides a more durable and water-resistant finish compared to wax, making it a suitable choice for high-traffic areas such as kitchens. Apply the sealant with a brush or roller, following the manufacturer's instructions. Allow each coat to dry completely before applying the next.
Reinstalling Hardware: Once the sealant has cured completely, reinstall the hardware. This completes the transformation of the cabinets, giving them a fresh, updated look.
Maintenance: Proper maintenance will help preserve the beauty and longevity of the chalk painted finish. Clean the cabinets regularly with a damp cloth and a mild cleaner. Avoid using abrasive cleaners or scouring pads, which can damage the finish. Reapply wax or sealant as needed to maintain the protective barrier.

How To Paint A Kitchen With Chalk Maison De Pax

Chalk Painted Kitchen Cabinets 2 Years Later Our Storied Home

Painting Kitchen Cabinets With Chalk Paint Simply Today Life

Why I Repainted My Chalk Painted Cabinets Sincerely Sara D Home Decor Diy Projects

How To Chalk Paint Kitchen Cabinets No Sanding Fast Easy Diy

Step By Kitchen Cabinet Painting With Annie Sloan Chalk Paint Jeanne Oliver

My Chalk Painted Cabinets 4 Years Later How Did They Do Artsy Chicks Rule

How I Chalk Painted My Kitchen Cabinets

Chalk Painted Kitchen Cabinets 2 Years Later Our Storied Home

Step By Kitchen Cabinet Painting With Annie Sloan Chalk Paint Jeanne Oliver