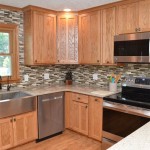
Light Rail Molding For Cabinets
Light rail molding is a type of decorative molding that is used to add a finishing touch to the tops of cabinets. It is typically made of wood or another durable material, and it can be either painted or stained to match the cabinets. Light rail molding can be used to add a touch of elegance to any kitchen or bathroom, and it is a relatively easy and inexpensive way to update the look of your cabinets.
There are many different styles of light rail molding available, so you can find one that will match the style of your cabinets and your home decor. Some of the most popular styles include:
- Crown molding: This is a classic style of molding that features a curved shape. It is a great choice for traditional or formal kitchens and bathrooms.
- Ogee molding: This is a type of molding that features a wave-like shape. It is a versatile style that can be used in a variety of settings, from traditional to modern.
- Cove molding: This is a type of molding that features a concave shape. It is a good choice for creating a more subtle look in your kitchen or bathroom.
Once you have chosen the style of light rail molding that you want, you will need to determine the size of the molding. The size of the molding will depend on the size of your cabinets and the amount of space that you have available. You will also need to decide whether you want the molding to be painted or stained. If you are painting the molding, you can choose any color that you want. If you are staining the molding, you will need to choose a stain that will match the color of your cabinets.
Installing light rail molding is a relatively easy process. You will need a few basic tools, including a saw, a hammer, and a level. You will also need some wood glue and some nails or screws. Once you have gathered your tools and materials, you can follow these steps to install the molding:
- Measure and cut the molding. Measure the length of the cabinet that you are installing the molding on. Cut the molding to the correct length using a saw.
- Apply wood glue to the back of the molding. Apply a thin layer of wood glue to the back of the molding. This will help to hold the molding in place.
- Position the molding on the cabinet. Position the molding on the top of the cabinet. Use a level to make sure that the molding is level.
- Nail or screw the molding in place. Use nails or screws to secure the molding in place. Make sure that the nails or screws are long enough to penetrate the cabinet.
Once you have installed the light rail molding, you can enjoy the updated look of your cabinets. Light rail molding is a simple and affordable way to add a touch of elegance to your kitchen or bathroom.
Here are some additional tips for installing light rail molding:
- If you are installing the molding on a painted cabinet, be sure to use a paintable caulk to fill in any gaps between the molding and the cabinet.
- If you are installing the molding on a stained cabinet, be sure to use a stainable caulk to fill in any gaps between the molding and the cabinet.
- If you are not sure how to install the molding, be sure to consult with a professional.

Thomasville Embellishments Small Light Rail Moulding

Dress Cabinets For Success With Light Rail Molding

Light Rail Moldings

Traditional Wood Edge Light Rail Thomasville Cabinetry

Light Rail Moulding Abode Cabinetry

Light Rail Molding For Kitchen Cabinets Dura Supreme Cabinetry

Cabinet Light Rail With Decorative Panels

Shaker Light Rail Moldings Features Benefits Rta Cabinet Options Youtube

Concave Light Rail Moulding Omega Cabinetry Embellishments

Light Rail Molding Bathroom 1 2 3 R Mayflower Construction Group