Painting Old Kitchen Cabinets Before And After
Many homeowners are hesitant to paint their kitchen cabinets because they are afraid of the time and effort involved. However, painting your kitchen cabinets is a relatively simple and inexpensive way to update your kitchen and give it a whole new look.
If you are thinking about painting your kitchen cabinets, then this before and after guide will help you get started. We will provide you with everything you need to know, from choosing the right paint to preparing your cabinets and applying the paint.
Before You Start
Before you start painting your kitchen cabinets, there are a few things you need to do to prepare.
- Clean your cabinets: The first step is to clean your cabinets to remove any dirt, grease, or food residue. You can do this with a mild soap and water solution.
- Remove the doors and hardware: Once your cabinets are clean, you need to remove the doors and hardware. This will make it easier to paint the cabinets and avoid getting paint on the hardware.
- Sand the cabinets: If your cabinets are glossy or have a lot of built-up paint, you will need to sand them lightly to create a smooth surface for the paint to adhere to.
- Prime the cabinets: Primer helps the paint to adhere to the cabinets and provides a smooth, even finish. Apply a coat of primer to all of the surfaces of the cabinets, including the inside of the doors.
Choosing the Right Paint
When choosing a paint for your kitchen cabinets, there are a few things to keep in mind.
- Type of paint: There are two types of paint that are commonly used for kitchen cabinets: latex paint and oil-based paint.
Latex paint is water-based and easy to clean up. It is also less durable than oil-based paint, making it a good choice for cabinets that are not heavily used. - Oil-based paint is more durable than latex paint and provides a smoother finish. However, it is also more difficult to clean up and can take longer to dry.
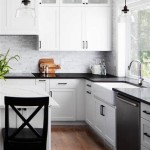
- Color: The color of your kitchen cabinets will have a big impact on the overall look of your kitchen.
When choosing a color, consider the style of your kitchen, the colors of your countertops and backsplash, and the amount of natural light in your kitchen.
Applying the Paint
Once you have chosen the right paint, you are ready to start painting. Here are the steps involved in applying the paint to your kitchen cabinets:
- Apply a thin coat of paint: Use a brush or roller to apply a thin, even coat of paint to all of the surfaces of the cabinets.
- Allow the paint to dry: Allow the paint to dry completely before applying a second coat.
- Apply a second coat of paint: Once the first coat is dry, apply a second coat of paint. This will help to provide a more even and durable finish.
- Allow the paint to cure: Once the second coat of paint is dry, allow it to cure for at least 24 hours before using the cabinets.
After You Finish
Once you have finished painting your kitchen cabinets, you will need to do a few things to finish the job.
- Reattach the doors and hardware: Once the paint is completely dry, you can reattach the doors and hardware to the cabinets.
- Clean the cabinets: Wipe down the cabinets with a damp cloth to remove any dust or debris.
- Enjoy your new kitchen: Sit back and enjoy your new kitchen cabinets!

15 Diy Kitchen Cabinet Makeovers Before After Photos Of Cabinets

9 Inspiring Kitchen Cabinet Makeovers Before And After Remodel Small Builder Grade Renovation

20 S Of Before And After Kitchen Makeovers With Cost Painting Cabinets

Diy Painting Your Kitchen Cabinets The Right Way

Our Painted Cabinets Five Years Later Nina Hendrick Home

Painted Cabinets Nashville Tn Before And After Photos Brown Kitchen Painting White

Kitchen Cabinet Colors Before After The Inspired Room

Painted Cabinets Nashville Tn Before And After Photos

Painted Cabinets Nashville Tn Before And After Photos

Update On Our Diy White Painted Kitchen Cabinets 2 Years Later